Below are notes related to Cadence installation. For technical questions, please check with your instructor or TA.
How to Change Cadence Data Output Directory
Cadence users may be assigned extra disk space separate from the user’s home directory.
For example, the instructor for EE216A may request SEASnet set up an extra directory for each student with 2GB of disk quota. In that case, each student in the EE216A course would be able to use the 5/w/class/ee216a/LOGINNAME directory for the duration of the quarter.
Below are instructions on how to configure Cadence to generate data output in that directory.
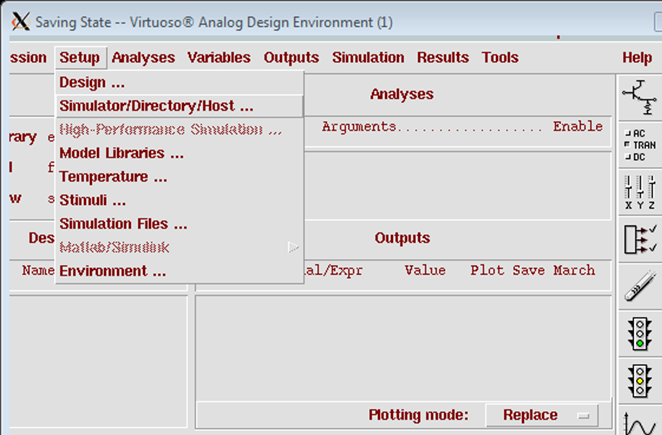
- Step 1: While running simulations in Cadence Analog Design Environment, go to <Setup> -> <Simulator/Directory/Host>
- Step 2: In the <Simulator/Directory/Host> window, change <Project Directory> to the directory that you want the output data to be in (i.e., /w/class/ee216a/testusr1). Be sure to include the complete path for the directory. Cadence will direct all simulation results to this directory.
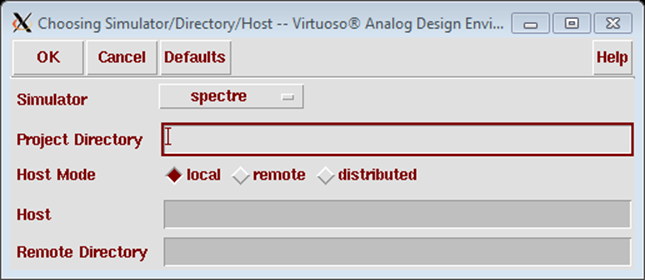
- Step 3: Click OK
- Step 4: Go to <Session> -> <Save State> to save your state. The state file is small because it only records your simulation settings. The next time you run Cadence, you can load the same simulation settings from <Session> -> <Load State>. Step 4 is optional, but if you don’t save the state, you will need to do Step 1 to Step 3 again the next time you run the simulation.
How to Release Cadence Lock After a Crashed Session
Run the following command to search and delete Cadence lock file from your home directory.
find . -type f -name "*.cdslck" -exec rm -f {} ;