What is folder sharing?
In Windows 2000/XP, a service called File and Printer Sharing is turned on by default. Files are shared by enabling shared access to a folder. Hence, for simplification, we shall just refer to it as shared folders.
What is the risk?
Be default, Windows XP uses a sharing type called Simple File Sharing (SFS). This type of sharing allows anyone on the network to access your shared files and folders without a password.** It is more suited towards a small network where you know the other users and trust them; for example, a home network. Also, in Windows 2000 and Windows XP (with SFS turned off), if your administrator’s password is weak, an attacker can get into your computer and cause a lot of damage.
**For more details, please see Microsoft’s instructions on how to configure file sharing.
What can I do?
Ask yourself if you need to share files/folders. Yes or No?
If you do not need to share files/folders, turn off File and Print Sharing and/or turn off the firewall exception for File and Print sharing (webpage to explain this in progress).
Windows 7
- By Default, Windows 7 does not have Folder Sharing enabled.
- You must change the properties of the folder to be shared to allow for it, as well as specify which users may have access to it.
- See Microsoft’s site for further information: File Sharing Essentials for Windows 7.
Windows XP
- Click Start, click Run…, and type in “ncpa.cpl”
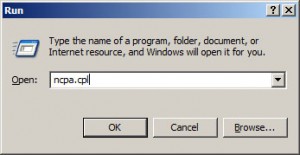
Press Enter/Click OK
- For each network entry, perform the next two steps:
Right-click and select Properties

Wired networks are usually called Local Area Connection and Wireless networks are called Wireless Network Connection
- In the box that lists This connection uses the following items:
Un-check the File and Printer Sharing for Microsoft Networks
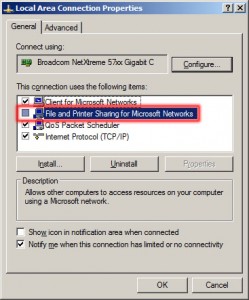
Click OK
If you do need to share folders, please make sure to
- Create a limited account to use for sharing:
Click Start, Click Run…, enter “nusrmgr.cpl”, Click
Create a new account,
Enter a username, click Next, click Limited, and click Create Account

- Make sure you have strong passwords for ALL the accounts on your computer
- Set permissions on your shared folders
-
- Right-click on the folder to be shared and select Sharing and
Security…
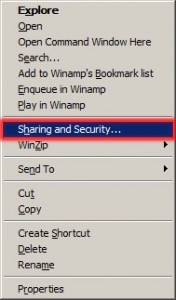
- Right-click on the folder to be shared and select Sharing and
-
- Select Share this folder to enable sharing and change the Share name if you wish, then click on Permissions
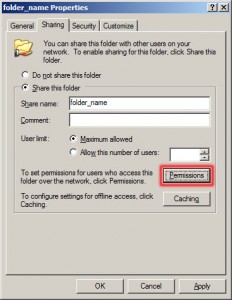
- Remove Everyone and add the user created earlier for sharing
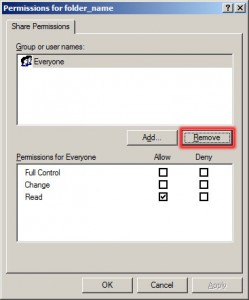
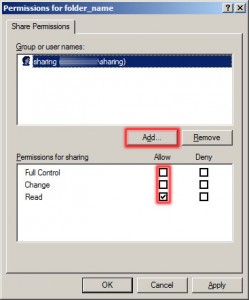
Make sure to Allow the minimum needed permissions
*Simple file sharing is on always for XP Home. It can be disabled in XP Pro.
**For more details, please see Microsoft’s instructions on how to configure file sharing.
Note: Staff-managed machines will need File and Printer Sharing to be left on, so please do not turn it off.